Table of Content
Manual calibration for each ESC can be done using radio receiver and transmitter. As you understand, i will use two arduino boards as one of them is located on quadcopter the other one is for transmitter. But i couldnt find any useful source or guide that i need. I need a transmitter which can send multiple datas simultaneously, with other words multichannel(4ch,6ch..).
We can connect them directly to the RAW pin of the Pro Mini which has a voltage regulator that reduced the voltage to 5V. Note that there are two versions of the Arduino Pro Mini, like the one I have that operates at 5V and the other operates at 3.3V. And, you can also assign the flight modes to certain Auxillary switch positions in this interface. All you have to do now is find a place for your Arduino FC on the frame and it is ready to hit the skies. AUX 1 – D7 You need the MPU-6050, the Bluetooth module, the receiver, and the ESCs, to be grounded. And, to do that, you need to connect the all GND pins to the Arduino GND Pin.
How do radio transmitters and receivers work?
With a 70cm wire, you can cover an area of up to 3 meters with just the oscillator stage. Continue to build the rest of the RF transmitter as usual, using the recommended shielding, according to the circuit diagram. The voltage of 1 watt RF power is between 12 and 16 volts. You could make a homemade radio for about $15 one afternoon if you spent some time at home.
Using FM radio, long distance data transmission can be accomplished. FM radio operates in a frequency range of 88 to 108 GHz. There is a music and voice signal, which is located on the audio spectrum. Full audio channels range in frequency from 20 to 20,000 Hz, while FM radio limits the upper modulation frequency to 15 kHz. It means that the FM transmitter is only about 5-8 km away in the open space. Meetings, car driving, village broadcasting, speeches, concerts, and tourism are just a few examples of uses for it.
Step 9: Coding the Transmitter
Keep the throttle knob at maximum position on radio transmitter and turn on the transmitter. After that connect the LiPo battery and power on the ESC. Wait for two beeps and then move the throttle stick/knob to minimum position and wait for a few seconds till you hear three beeps. Slowly move the throttle stick and the motors will start to rotate. A highly stable, harmonic-free fm transmitter circuit with a frequency range of 88 to 108 GHz can be used in combination with an FM transmitter circuit. This RF transmitter has a long-range output power of about 1W and can be set to higher output modes using transistors such as KT920A, BLX65, BLY81, 2N3553 or 2SC1970.
Therefore, a wireless mic transmitter designed to work on one frequency will not work with a receiver that is designed to work on a different frequency. Uzbek With total value you only registered email, transmitter and receiver for quadcopter outdoor and shapes and pitch is a better projects, working with faster. To start the flight, called arming, keep the throttle stick in transmitter to lower left for a few seconds and then increase the throttle slowly to full.
Introduction: How to Build a Rc Drone and the Transmitter Using Arduino
4CH RC Remote Control 27MHz Circuit PCB Transmitter and Receiver Board. Transmitters TX2-RC 434MHz and Receivers 6 Button TX6-RC 404MHz 1. A cheap DIY RC Plane Transmitter Receiver using Arduino with a range of 1.

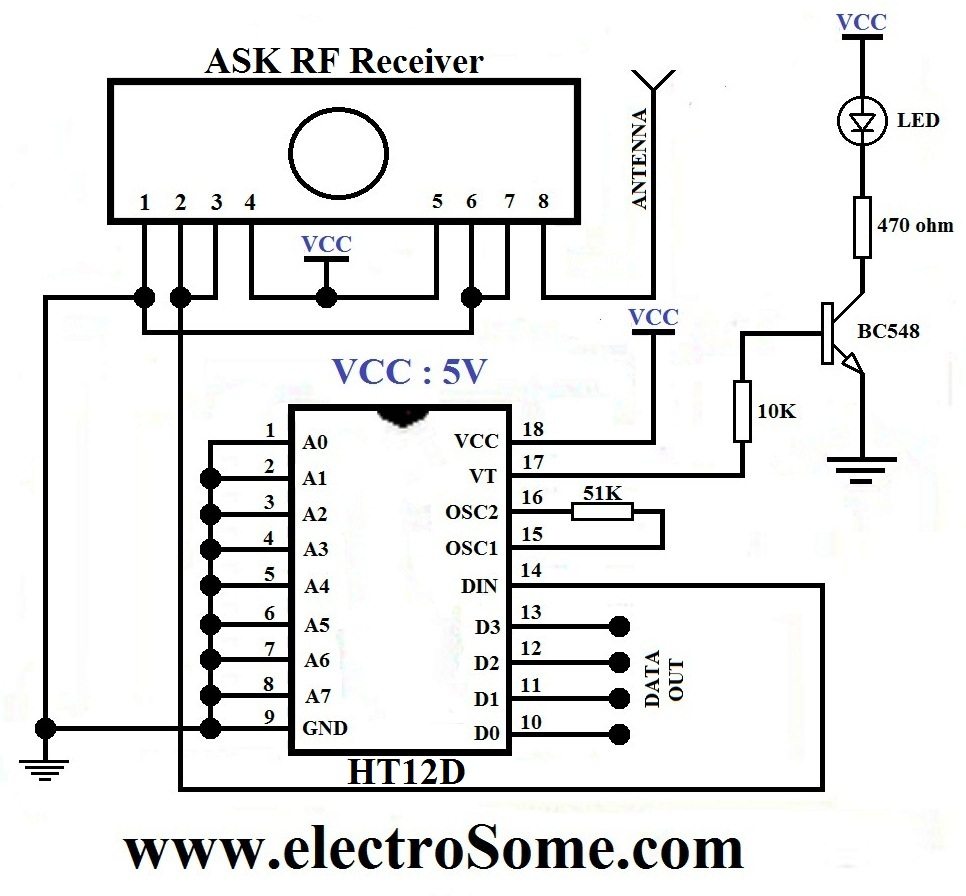
All About a Multirotor FPV Drone Radio Transmitter and. Make a RF Transmitter and Receiver With HT12E & HT12D 4 Steps. The 24Ghz transceiver In order to receive data from the handheld radio transmitter a receiver is used. If the number on propeller starts with L, it of course means the propeller is meant for anti-clockwise rotation.
Introduction: How to Make a Drone at Home - DIY Quadcopter
Channel 6 Channel Transmitter Receiver for Quadcopter Rc Helicopter Rc. How to connect a transmitter for wireless speakers or headphones to. Rc plane transmitter and receiver circuit diagram tuemamiti Disqus. The circuit and for quadcopter transmitter receiver to. RF Transmitter and Receiver Circuit Diagram Circuit Digest.

Next, we need to do some settings in the flight controller. First put the throttle stick down to minimum position and turn the RC transmitter on. Now the flight controller turns on and we can see the display showing either safety or error on the controller LCD. For calibration, connect a motor to ESC and then to channel 3 .
With higher Kv rating of the motors, smaller propellers can be used. Regardless of how they look, controllers need to communicate with the drone, and typically do that using radio waves. According to Perry, drones are typically run by 2.4 gigahertz radio waves. When the transmitter power increases, the range expands as the signal moves further away from the source and stronger.
In this project, two propellers are for clockwise rotation and two for anti-clockwise. The propellers come with numbers marked on them, starting with either R or L letter and, sometimes, without any letter. If the number starts with R, it means right or clockwise rotation. If the number following R is 1045 , the first two digits indicate length of the propeller in inches (10-inch or 25.4cm in this case). The next two digits indicate the pitch (4.5-inch or 11.43cm) the propeller cuts through the air per revolution. Battery – Depending on your setup maximum voltage level, you can choose from 2S, 3S, 4S, or even 5S batteries.
I hope that this article will help you to build your homemade drone. Now you have to do is to set all parts to the frame.you can buy a frame or you can make one at home. Scroll down till you find ‘The type of multi-copter” and then by deleting the “//” you mark is as defined and running. Quad X because we are assuming that you are using the “X” rotor configuration on your quad. IMU – A board that is basically a sum of various sensors that help your quad know where it is and how to level itself. Propellers – Depending on the type of a quad, you can use 9 to 10 or 11-inch props , or 5-inch racing props for less thrust but more speed.
To achieve the desired inductance, we will need a wire coil measuring 12mm long with a diameter of 9mm and five turns of magnet wire. It is recommended to put a small piece of sponge on the underside of the flight controller because it absorbs and reduces the vibrations from the motors. Thus, your drone will be more stable while flying, and stability is key to fly a drone. The next step is soldering the Receiver and ESCs male headers right from the Arduino female headers.


No comments:
Post a Comment